The
cheeks are the canvas of the face, a broad, sloping plane where color, light, and texture converge to define our expressions and shape our visage. From the subtle warmth of blush to the ethereal glow of highlighter, applying products to this area is less a mere step in a routine and more an art form that requires understanding, technique, and the right tools. The best way to apply products to the
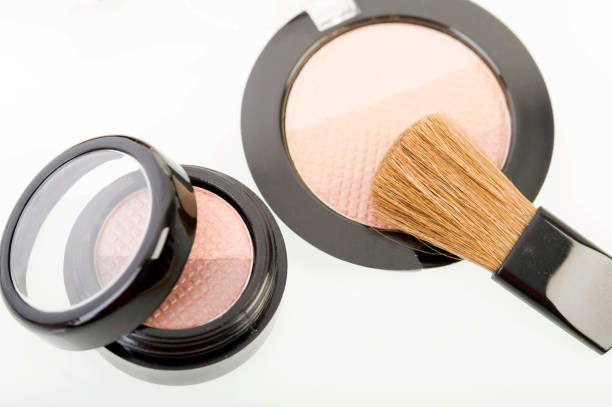
cheeks is not a singular method, but a holistic approach that considers product formulation, facial anatomy, tool selection, and blending mastery to achieve a result that looks naturally radiant and seamlessly integrated.Fundamentally, successful cheek application begins with preparation and product order. The cheek should be a smooth, hydrated base, typically after moisturizer and foundation or skin tint. Cream and liquid products, such as cream blushes or liquid illuminators, must be applied before any powder setting steps. This allows them to meld with the skin, creating a second-skin, dewy effect that is inherently more natural. Powder products, conversely, are applied after setting powder, adhering best to a velvety matte base. Understanding this simple hierarchy prevents patchiness and ensures each product layer performs optimally.The choice of tool is paramount and varies dramatically by product type. For creams and liquids, the fingertips are often the most underrated yet effective instruments. The natural warmth of the fingers helps to soften and sheer out the product, allowing for a controlled, buildable application. Start by dabbing a small amount onto the apples of the cheeks, then use gentle, upward patting and circular motions to diffuse the color back towards the hairline. For those who prefer tools, a densely-packed, slightly damp makeup sponge is excellent for a seamless, airbrushed finish, while a synthetic stippling brush can provide more precision. For powder blushes and bronzers, a fluffy, angled brush with soft bristles is non-negotiable. It picks up the perfect amount of product and allows for controlled placement and effortless blending. The key is to tap off excess powder before approaching the face to avoid harsh, concentrated stripes of color.Placement, however, is where artistry truly meets anatomy. The outdated notion of simply smiling and applying blush to the rounded “apples” often fails to flatter most face shapes as the face relaxes. A more universally enhancing technique is to apply product along the cheekbones. To find this zone, gently feel for the bony ridge beneath the eye socket. Applying blush or bronzer just below this ridge, sweeping from the center of the cheek back towards the temple, lifts and defines the facial structure. Highlighter then finds its home on the highest point of the cheekbone, just above where the blush ends, to catch the light. This strategic placement creates dimension and mimics a healthy, natural flush that appears lit from within.Ultimately, the unifying principle of all great cheek application is blending. There should be no discernible lines where the product begins or ends. After initial placement, use clean, tool-appropriate motions to soften edges. With powder brushes, use light, circular buffing motions. With a sponge, a gentle rolling or patting motion blends boundaries. The goal is for the color to appear as if it is emanating from within the skin itself, not sitting atop it. Finally, always assess your work in natural light, which is the most honest critic, ensuring the final effect is harmonious and balanced. By respecting product properties, choosing
tools wisely, applying with anatomical awareness, and blending without mercy, one can master the art of the cheeks, turning a simple act of application into a transformative enhancement of natural beauty.